Sunday, December 2, 2012

Welcome home, Dustin Smiley!

Yesterday (Saturday, December 1st) was the long awaited arrival day for Dustin Smiley.  He has been on a 13-month deployment with the US Navy.  You may recall that we were guests of the Smiley's back in May!

His wife Sarah is a syndicated writer and for the past year, has had a guest over for Dinner With The Smileys. 

Besides having us over in May, they have also had visitors such as Senator Susan Collins, Senator-Elect Angus King, former Governor John Baldacci and many, many more.  Its been an amazing journey, for them and for all her readers.  

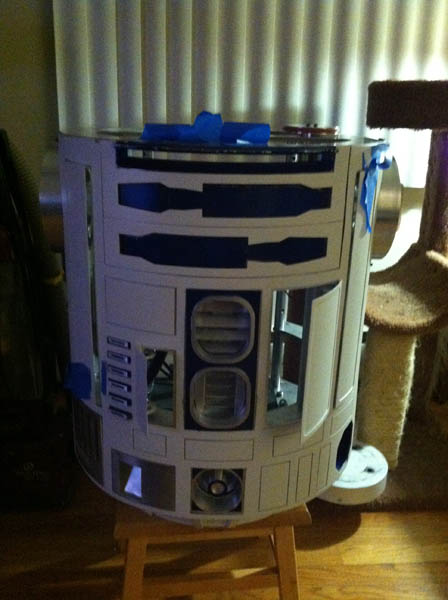
As you may know from following my blog, my R2 was in need of serious fixing when I noticed the frame had some issues.  After two years of adventures, visits and so forth, the original frame was showing its age, with a side structure piece beginning to fail.  I had a newer frame available so the process of transitioning everything from one frame to another began.  Well, there were complications.  Much like taking everything from a 2000 model car into a 2012 one, modifications were needed.  Then, I managed to tear the ligament in my left hand (Gamekeeper's Thumb), which completely halted my building progress for a few weeks.  However, despite the complications, progress continued on my new and improved R2 !

The airport would provide some new challenges for R2 and I.  The idea of pulling up in front of the airport and rolling inside with an R2-D2 sounded easy enough.  Then, I thought better of it, with beefed up airport security, a busy terminal and so on.  However, the 4 Points Sheraton hotel is connected to the airport via a connecting, enclosed bridge.

Calling the Four Points Sheraton was a very amusing experience, as my coworkers who overheard the phone call can share.  How do you call, out of the blue, and ask if it is OK if an R2-D2 parks in your lobby for a few minutes to get setup to greet a flight home?  

I did manage to communicate my intentions to the general manager, who, after a long pause, said "Okay.".  Well, that sounded promising!

The flight was scheduled to arrive just before noon, so I planned to be at the Sheraton, ready to go, by 11:00.  When R2 and I rolled into the lobby, the front desk staff were quite surprised, and excited, to see us.  I explained that I just needed to fire up R2's computer, do a safety check, make sure the sound remote was working (my Windows XBOX controller) and head over.  That took a few minutes to do and then we made the journey across the enclosed bride to the airport terminal...

Four Points Sheraton staff listen to R2 share his thoughts

Big thanks to the Four Points of Bangor for allowing us to quickly setup from their lobby!

Hey!  Very color coordinated to R2!
 Once inside, we were pretty easy to spot.  R2 posed for pictures with guests waiting for passengers, passengers waiting for flights and the general public !


While awaiting Dustin's commercial flight to land, another aircraft landed...it was a chartered flight of US Army soldiers just flying home from Afghanistan.  Their final destination was Colorado.  It turns out that these ladies and gentlemen do EOD work, the demolition work of detecting and destroying IEDs/bombs....using robots!  They posed for pictures with R2-D2 and I made sure to thank them all for their service.


 Just after I finished chatting with the soldiers, Dustin arrived!  I was too far away to get any good pictures but I can tell you that a TV show film crew was there to cover it.  More on that at a later date!

The Smiley family has been reunited and after saying Hello to each one of the guests, they headed for home.

While at the airport, R2 wanted to see if the TSA would screen him =)  We couldn't resist some good natured fun with the SEE something SAY something sign...

 
We made our exit and headed back to the Four Points Sheraton.  R2 posed for some pictures by their beautiful Christmas tree before heading back to the van.


Next Friday will be our next event, which will be a gathering of all the visitors to the Dinner With The Smileys over the past year.  It should be a very special event I look forward to attending with R2-D2!


Crunch time! Getting R2 ready for Saturday

I've been too busy to even post blog updates on the R2 rebuild!  So, let's catch up...

With the side vents done, I needed a clever way to mount them to the frame.  As I did with the previous build, I opted to use magnets so that I can easily remove the vents as needed.

I drilled a 5/32 hole into the side of the frame and tapped it to a 10-24 thread.  The magnets I found have a hole in the middle and this works perfectly.  I can also adjust how deep to "thread" the magnet into and out of the frame for an optimal fit.


Next up was re-located the power switches and charger port.  Previously it had been located in the a back panel but that was awkward to get to.  Plus, with the development of the charger port lighting, I wanted to make that functional!


Here's how it looks from inside, with the Arduino micro controller mounted above with double-sided tape.


Next up was installing the amplifier and wiring up the speakers...


Then the slip ring, which routes power from the body to the dome had to be tested and re-installed.  I wanted to verify all 24 wires had continuity!


...and with that, I had everything set to go.  One glitch is the dome drive.  Due to its new location, its not making enough contact to spin the dome right.  But, that's fine...I'll address that after the event...

Sunday, November 25, 2012

Side vents coming together

Today I finished up work on R2's side vents.

I painted the back plate the day before and it was set to go.

Here's I have lined up the plates and clamped them together.  


As I did with my previous set, I used JB Weld to bond the pieces together.  Since there isn't a lot of area to apply epoxy too, I made sure the sides were lined up and applied it in the seams


After this dries overnight, I'll use silicone to attach a piece of steel sheet metal to the back.  This will allow for a magnet mounted in the frame to hold it in place.
 

Sunday, November 18, 2012

Revamping the charging port

Way back when I first got R2 going, my fellow building friend, Kevin, came up with a great way to plug into in to recharge the batteries.  He used a trickle charger that attaches to a wall outlet and replaced the end with a microphone jack.  The portion that was installed in R2, the male plug portion, was then wired to go to the two electrical systems; one dedicated to the foot motors and one dedicated to all the electronics.  With the ON OFF ON toggle switches for each system, I could put one system in the recharge position and the trickle charger would recharge that battery.  In the other ON position, it would power on R2.  And, of course, OFF would shut down all power.


Since then, the R2 Builders have been busy adding more scene-accurate details to our droids.  Among the many things has been the panel on the front of R2, where in THE EMPIRE STRIKES BACK, Luke plugged him in to a power charger.

From ESB, not long after Luke's X-WING fighter crash lands on Dagobah.

The builders came up with a way to replicate not only the look and pattern of the blinking lights, but to a degree, function!


The problem I ran into was the LEDs were a tad too big to fit into the plastic template cover made for it.  Plus, being made of plastic, I had some concerns over how strong it would be to handle the plugging/unplugging functions.

Thankfully I had purchased extra PCBs and it takes about 30 minutes to piece these together.  I had a 1/8th inch thick aluminum version of the template made up and painted it flat black earlier in the day.


Not very visible but I have a clear piece of acrylic under the charging plate so the LEDs will be flush when I solder them in place.
 I debated about mounting the charging face plate in front of or behind the template.  Due to the shallow depth of the press-to-release notch on the microphone jack, I decided to place it on top.  Perhaps on the second R2, I'll change around to a different jack type.


Now the existing ON OF ON switches are pretty big.  I told think they can fit on this charging template.


The PCB stays in place quite well but to be sure, I'm added some double-sided Servo Tape...


Another challenge, finding a safe spot to mount the Arduino Pro Micro!
 I think the best place to relocate the switches are going to be the panel just below, since nothing is currently there and the existing wiring would reach just fine.


I need to make a new structure for the switches to mount to, then securely attach to the frame.  


Sunday, November 4, 2012

From doodling to part in hand

My fellow R2 Builders are incredible people.  Recently I was observing how some animate R2's holoprojector.  Upon seeing what they had done, I wanted to see if I could do something similar, except in aluminum!

While watching my favorite TV show, The Big Bang Theory, I started tracing around an aluminum holoprojector and doodled away until I came up with this...


Granted its not a final design, but sitting back with pencil and digital micrometer, it was a good start.  I shared my idea with my friend, Fred, whose CNC machine has produced several great parts for my R2 lately.  A few days later, he turned my scribbling into aluminum goodness!


The cut aways are for two micro servos.  Once lined up, I marked where to drill and tap some mounting holes (4-40 thread)


The end cap has a 10-24 thread screw in it now, a spot for the servos to attach to and move about. 


And here is the temporary setup using a Servo Tester to move the servos around, checking things out.  

 
 So far, its rather clunky.  These micro servos are cheap knock-offs and aren't moving very smoothly, so some HiTech micro servos with more power and torque are going to be needed.  I also need to come up with a better linkage than two twisted up paperclips!  But...it is a start!


Trimming down the battery holder rods

Over the past two days, I have been working on tweaking the battery holder to handle the large, 12v 18ah batteries I use in R2

My friend, Fred, was able to translate my doodling into something that would use the existing hole pattern.

Left: Holder I had made, Right: Included holder designed for 12v 7ah batteries

Installation is pretty straight forward...


But I noticed we had a small issue getting the the batteries into the outer sides.

The round battery frame rods extend into the battery holder space.....

I was pondering a few ways to trim the round aluminum rods and thought i would ask Fred for his thoughts.  Hacksaw?  Dremel?  File?  No!  Bring it over, let the CNC do it!


We used a file to remove whatever remained.

And here's how it all looks now...


Now 41 pounds of batteries no longer required an awkward bungee cord and bracket to stay in place!


Thursday, November 1, 2012

Center vents installed...again!

As I blogged about last time, the center vents were being problematic.

You see, when you dismantle an R2-D2, then do a complete rebuild on a new frame, all those parts that were "complicated" the first are even more so the second time around!

One consistent problem I have had with R2 has been the center vents.  Little fingers like to get in there and push/shove/bend things out of alignment.  Over the years, I have simply tightened the set screws on each side when they got loose and had some movement.  However, with a new frame and new side rails holding them in place, new things had to be added.

And the sheet metal piece, painted blue, that goes around them seems to get bent and mangled rather quickly.  Since there is little surface area for it to adhere to on the skins, its problematic.  

Who knew a droid's life could be so complicated, right?

The first thing I set out to do was to take that vent surround piece and place the surrounds in them.  This helps act like a 'template' to temporarily place them into the vent rails, as the spacing between the top and bottom vents are essential.  Then I use some 10-24 thread screws to hold them in place...

Making sure everything is lined up and centered...

Now for more challenges...how to mark the vent surrounds.  A pencil won't fit and nor will a magic marker.  Its a tight spot.  

Then it dawned on me....use that blue metal dye I have been using on R2 #2.  It dries extremely fast and would work perfectly to mark a spot.

I chopped down most of a Q-tip and dabbed a bit of the dye on the tip.  I gently removed one screw at a time, then dabbed some of the Dykem dye thru the mounting holes.


Blue markings show where to drill a shallow hole so the set screws can better grip and hold the vents in place


You can see where the previous shallow holes were drilled (I say holes but I did not drill all the way thru).  With the placement of the holes marked, its just a matter of using the center punch and drilling into each blue dot.


With the skins off, its time to use the set screws...we line them up to the new holes and gently screw them into position


 While doing this, I took the vent surround piece and tried to remove some of the bends in it.  I then sanded off all the paint, then on the other side, sanded off all the old, dried up adhesive.  I still have some of the paints used for this R2, thankfully.


While snapping a picture of the newly painted and clear coated piece, my cat "Mokey" did the Photo Bomb thing.  Just as I was taking the picture, he leaned in to smell the piece.  That's my boy!

It passed the sniff test!
Then it was time to VERY GENTLY put the skins back on and place the vent surround piece back on.  Before sliding it all the way flush against the skins, I used a Q-tip and some silicone adhesive on the back of it.  Then I secured it in place to dry with some Painter's Tape.


And here's how it looks today with the tape removed...